I realize that it has been some time since I made my last blog post, and many things have happened since April...
I am still in the process of writing up my IFJ manuscript. Having finally sent a first draft to my supervisor, I am currently re-working my figures. This takes A LOT of time!
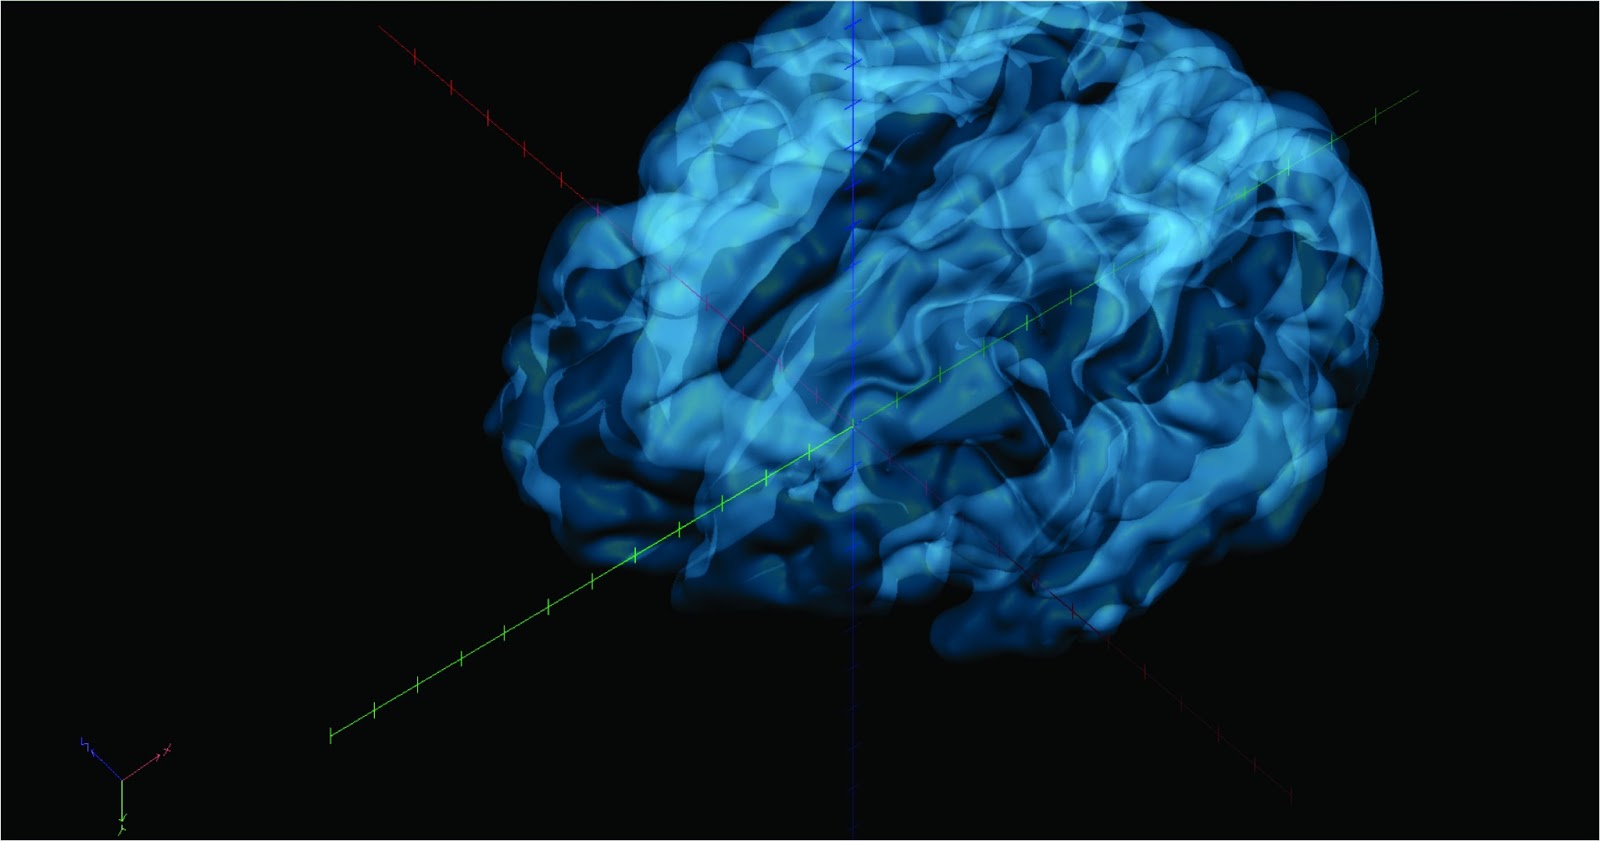
While creating my figures initially I ran in to some problems figuring out how to create a "Glass Brain" image in Brain Voyager from an anatomical scan in which I anatomically landmarked my region of interest. If it took me days to perfect, naturally there must be other people out there with the same inquiry, so i have decided to share the process of creating a figure such as this one...
Step 1
Open Brain Voyager → File → Open → VMR file (aligned to ACPC, in Talairach coordinates)

Step 2
Open 3D volume tools (little cube on left hand side) → Click on Segmentation Tab → Auto.Segm.
Under segmentation steps, click every box
Under processing space info, should be in talairach
Under cortex reconstruction, click all boxes
Press GO
The BV window for white/grey matter will pop up with a predetermined number. You can choose to change this, however I have left it with the value that Brain Voyager determined → click ok
Let this load. Don't click on anything on the screen (sometimes the mesh will not go to completion if you do). This process should take a couple minutes, depending on the speed of your computer.
A second tab should be created now, with your original file name + _RH_GM.srf
You will only see one hemisphere, however the left hemisphere was also created, and should be in the same file as your .vmr

Step 3
Click on the Meshes tab in Brain Voyager → Add Mesh → Add the other hemisphere (the file that has _RH_GM.srf OR _LH_GM.srf). You will now have two 3D hemispheres on your screen

Step 4
Click on the Scene tab → Scene overview → This shows you which meshes you have open + which ones are active.
Click on the Scene tab → Merge Meshes in Scene → This will merge the two hemispheres in to one mesh (much easier to work with when moving through steps 5 and 6)

Step 5
Click on the Meshes Tab → Rendering Options → Quality display effects → Click Transparency
OPTIONAL: You can change the degree of transparency under the alpha
Step 6
You can change the color of 3D brain by going to...
Meshes → Background and curvature colors → Default and convex color → Choose color here

Adding an anatomically landmarked region of interest
If you have anatomically landmarked a region of interest you can created a mesh version of this region and add it to your glass brain as follows
Step 1
On your .vmr screen, press CTRL+R. This should bring up the volume of interest analysis screen
Select your regions of interest (SHOW VOI)
Under the Options tab, lower right corner of volume of interest analysis GUI, which will bring up a VOI Analysis Options GUI
Click on the VOI Functions Tab

Step 2
Click CREATE under VOI -> Surface Clusters

Step 3
Under Meshes, Click Mesh Morphing, Choose your parameters, Press GO. You have now created morphed mesh regions of interest.

Step 3
Under Meshes, click Add Mesh. Add your Merged.srt brain

Step 4
Finally, make yourself a glass brain while leaving the region of interest opaque
